This section explains how to prepare images before uploading them to the File Manager. Within the File Manager, preparation folders are used to store images and files for display on the website.
Before Uploading Images to Web Pages
Important: When creating posts (e.g., blogs, articles, news) using the form upload, images are uploaded directly from your computer and do not require formatting based on these guidelines.
Steps prior to uploading images through the File Manager:
Organise Files: Store images in appropriate folders for easy access and management.
File Naming: Use clear, descriptive file names to improve SEO and maintain organisation.
When replacing an existing image, rename the new file before uploading.
If the filename remains the same, the website may not recognise the updated image.
Image Sizing: Ensure images are scaled correctly to fit the webpage layout.
File Format: Use common web formats such as JPEG or PNG for maximum compatibility.
Optimisation: Compress images to balance good visual quality with fast page load times.
Alt Text: When uploaded and place on the page, add descriptive alt text for accessibility and search visibility.
Properly formatted and organised images significantly enhance website performance and user experience.
IMAGE SIZE AND FORMAT
Preparing images and graphics for upload
Before you start, make sure that all images and graphics meet the following requirements:
File Types: Accepted formats are JPG, GIF, PNG, and AVI.
File Size: Files must be no larger than 1MB.
Larger files can slow down the website and may cause pages to break.
Important Display Guidelines:
Images can be visually reduced on the page after uploading to the File Manager. This does not reduce the file size.
Images should not be enlarged beyond their original size on the page, as this will cause them to appear pixelated or fuzzy.
Recommended Formats:
JPG – Best for photographs.
GIF – Ideal for graphics with flat colours, such as logos.
PNG – Best for images requiring transparent backgrounds.
Image Resolution:
Scan or save all images at 72 dpi (dots per inch).
Alternatively, ensure images are no more than 1400 pixels wide — this is the maximum width typically needed for web display.
Image sizes for different areas of your page
Sizes are a guide only and individual websites may have slight variations. Check 'Your Notes' if your site has custom features.
Gallery Images: Approx: 1000 x 800 pw @ 72dpi Slideshow: 1400 (w) x 400 (h) px @ 72dpi Extra Wide Content: Approx 1400 (w) x 400 (h) px @ 72dpi Top Content: Approx 1320 (w) x 400 (h) px @ 72dpi Main Content: Approx 860 (w) x Any height px @ 72dpi Right hand column - Custom Panel 1: The vertical area in the right of the page. Approx 440px (max) wide @72dpi Bottom Content: Depending on how it has been coded: - approx: 1320x400px or >1400x400px @72dpi
Resizing Images
To resize images before uploading, you will need a graphics program on your computer, such as:
The File Manager contains folders, created by the website manager, for uploading images and files to your web pages.
Guidelines prior to uploading images:
Use the Correct Folder: Always upload images into the appropriate folder to ensure proper organisation and display.
Renaming for updates:
When replacing an existing image, rename the new file before uploading.
If the filename remains the same, the website may not recognise the updated image.
File Organisation: Store images in relevant folders to maintain a clear, manageable structure.
Image Preparation: Optimise images for web use by adjusting size, format, and compression before uploading.
Following these steps ensures that images are correctly displayed and easily managed within the website.
Working in the File Manager
To Preview, Rename, Cut, Copy, Download or Delete an image use the appropriate icon below or beside the image.
To move an image to another folder: Select the Cut icon→ go to the destination folder → select Paste icon in the yellow window that should appear at the at the top of the file manager.
Switch between thumbnail Grid and List view be toggling between the menu items.
Reorder list of files by selecting, Filename, Date, Size or Type.
Change an image filename
To Rename an image or filename use the white pen icon in the File Manager below or beside the image or file you want a different name.
Change an image filename, rename an image, rename a filename, alter an image name, alter a filename., name of the file, Change an image name.
Finding an uploaded image's size
To check the size of an uploaded image:
Go to Site Tools > File Manager.
Locate the image in the folder directory on the left.
Sort by Filename, Date, Size or Type to help find your file.
See file dimensions below the Image name (in pixels).
Record image sizes in Your Notes (far left menu in page edit mode).
This section explains how to enhance an image for better user experience.
Adding Title and Alt tags to your image
Place the image into your text page using File Manager.
Right-click on the image.
Click on the option labeled "Image Details."
Fill in Alternative description and/or Image Title
Save
The differences between Alt Tags and Image Titles.
The differences between Alternative description (alt tags) and Image Titles are:
Alt tags should be short for describing the image’s purpose.
Image titles can be longer for communication with the user.
Alt tags are for screen readers and search engine crawlers.
Image titles are for user experience.
Alt tags can’t be seen on the web page.
Image titles can be visually rendered on the web page
Alt tags are seen as an alternative textual expression of the image.
Image titles are seen as image tooltips,
Text wrap an image
To get an image to sit left or right, with the text wrapping around it.
Place the cursor at the beginning of the text, where you wish to place the image.
Upload the image to the page.
With the image selected, select the dropdown menu 'Paragraph' (left of the Tx icon), select Alignment.
Select either Block/Image Left with margin or Block/Image Right with margin.
NOTE: If you have added a caption, under the image, go to the Alignment dropdown and use 'Left' or 'Right' instead of Block Image.
Block/Image Left with margin. Maecenas non eleifend nibh. Sed tincidunt accumsan justo, ut vestibulum velit blandit quis. Lorem ipsum dolor sit amet, consectetur adipiscing elit. In libero nisl, ultrices ut imperdiet vitae, varius in mauris. Nunc ut dolor nec lacus vehicula consequat at vitae ligula. Nullam convallis, diam ut maximus egestas, lorem sapien maximus orci, vitae porta nunc mauris at nisl. Suspendisse sed tortor at nisi gravida ultrices. Donec urna purus, hendrerit id diam in, vulputate pellentesque justo. Class aptent taciti sociosqu ad litora torquent per conubia nostra, per inceptos himenaeos. Nulla semper augue id scelerisque venenatis. Ut commodo nec justo vitae semper. Donec eu posuere neque. Nunc neque magna, ullamcorper quis auctor eget, convallis id diam. Pellentesque sollicitudin facilisis metus at suscipit.
Image Hover: Switching to Another Image
On most Flightdec websites, a change in colour or contrast when hovering over an image or highlighted text indicates it’s a clickable link.
Default Hover Effect
By default, images fade to 70% opacity on hover. If this effect isn’t working, use your admin HELP to request an adjustment or to restore it.
Custom Hover: Swapping to a Different Image
1. Prepare Your Images
Create two versions of the image.
Name the hover version by adding “-hover” before the .jpg extension.
Example:
Normal image: HomeImage.jpg
Hover image: HomeImage-hover.jpg
2. Upload the Images
Upload both images into the same folder in your File Manager.
3. Apply the Hover Swap
Select the image you want a hover on.
In the toolbar, select the "paragraph" menu next to the Tx icon.
From the dropdown, select Responsive Styles.
Click "Hover Image Swap" to activate the effect.
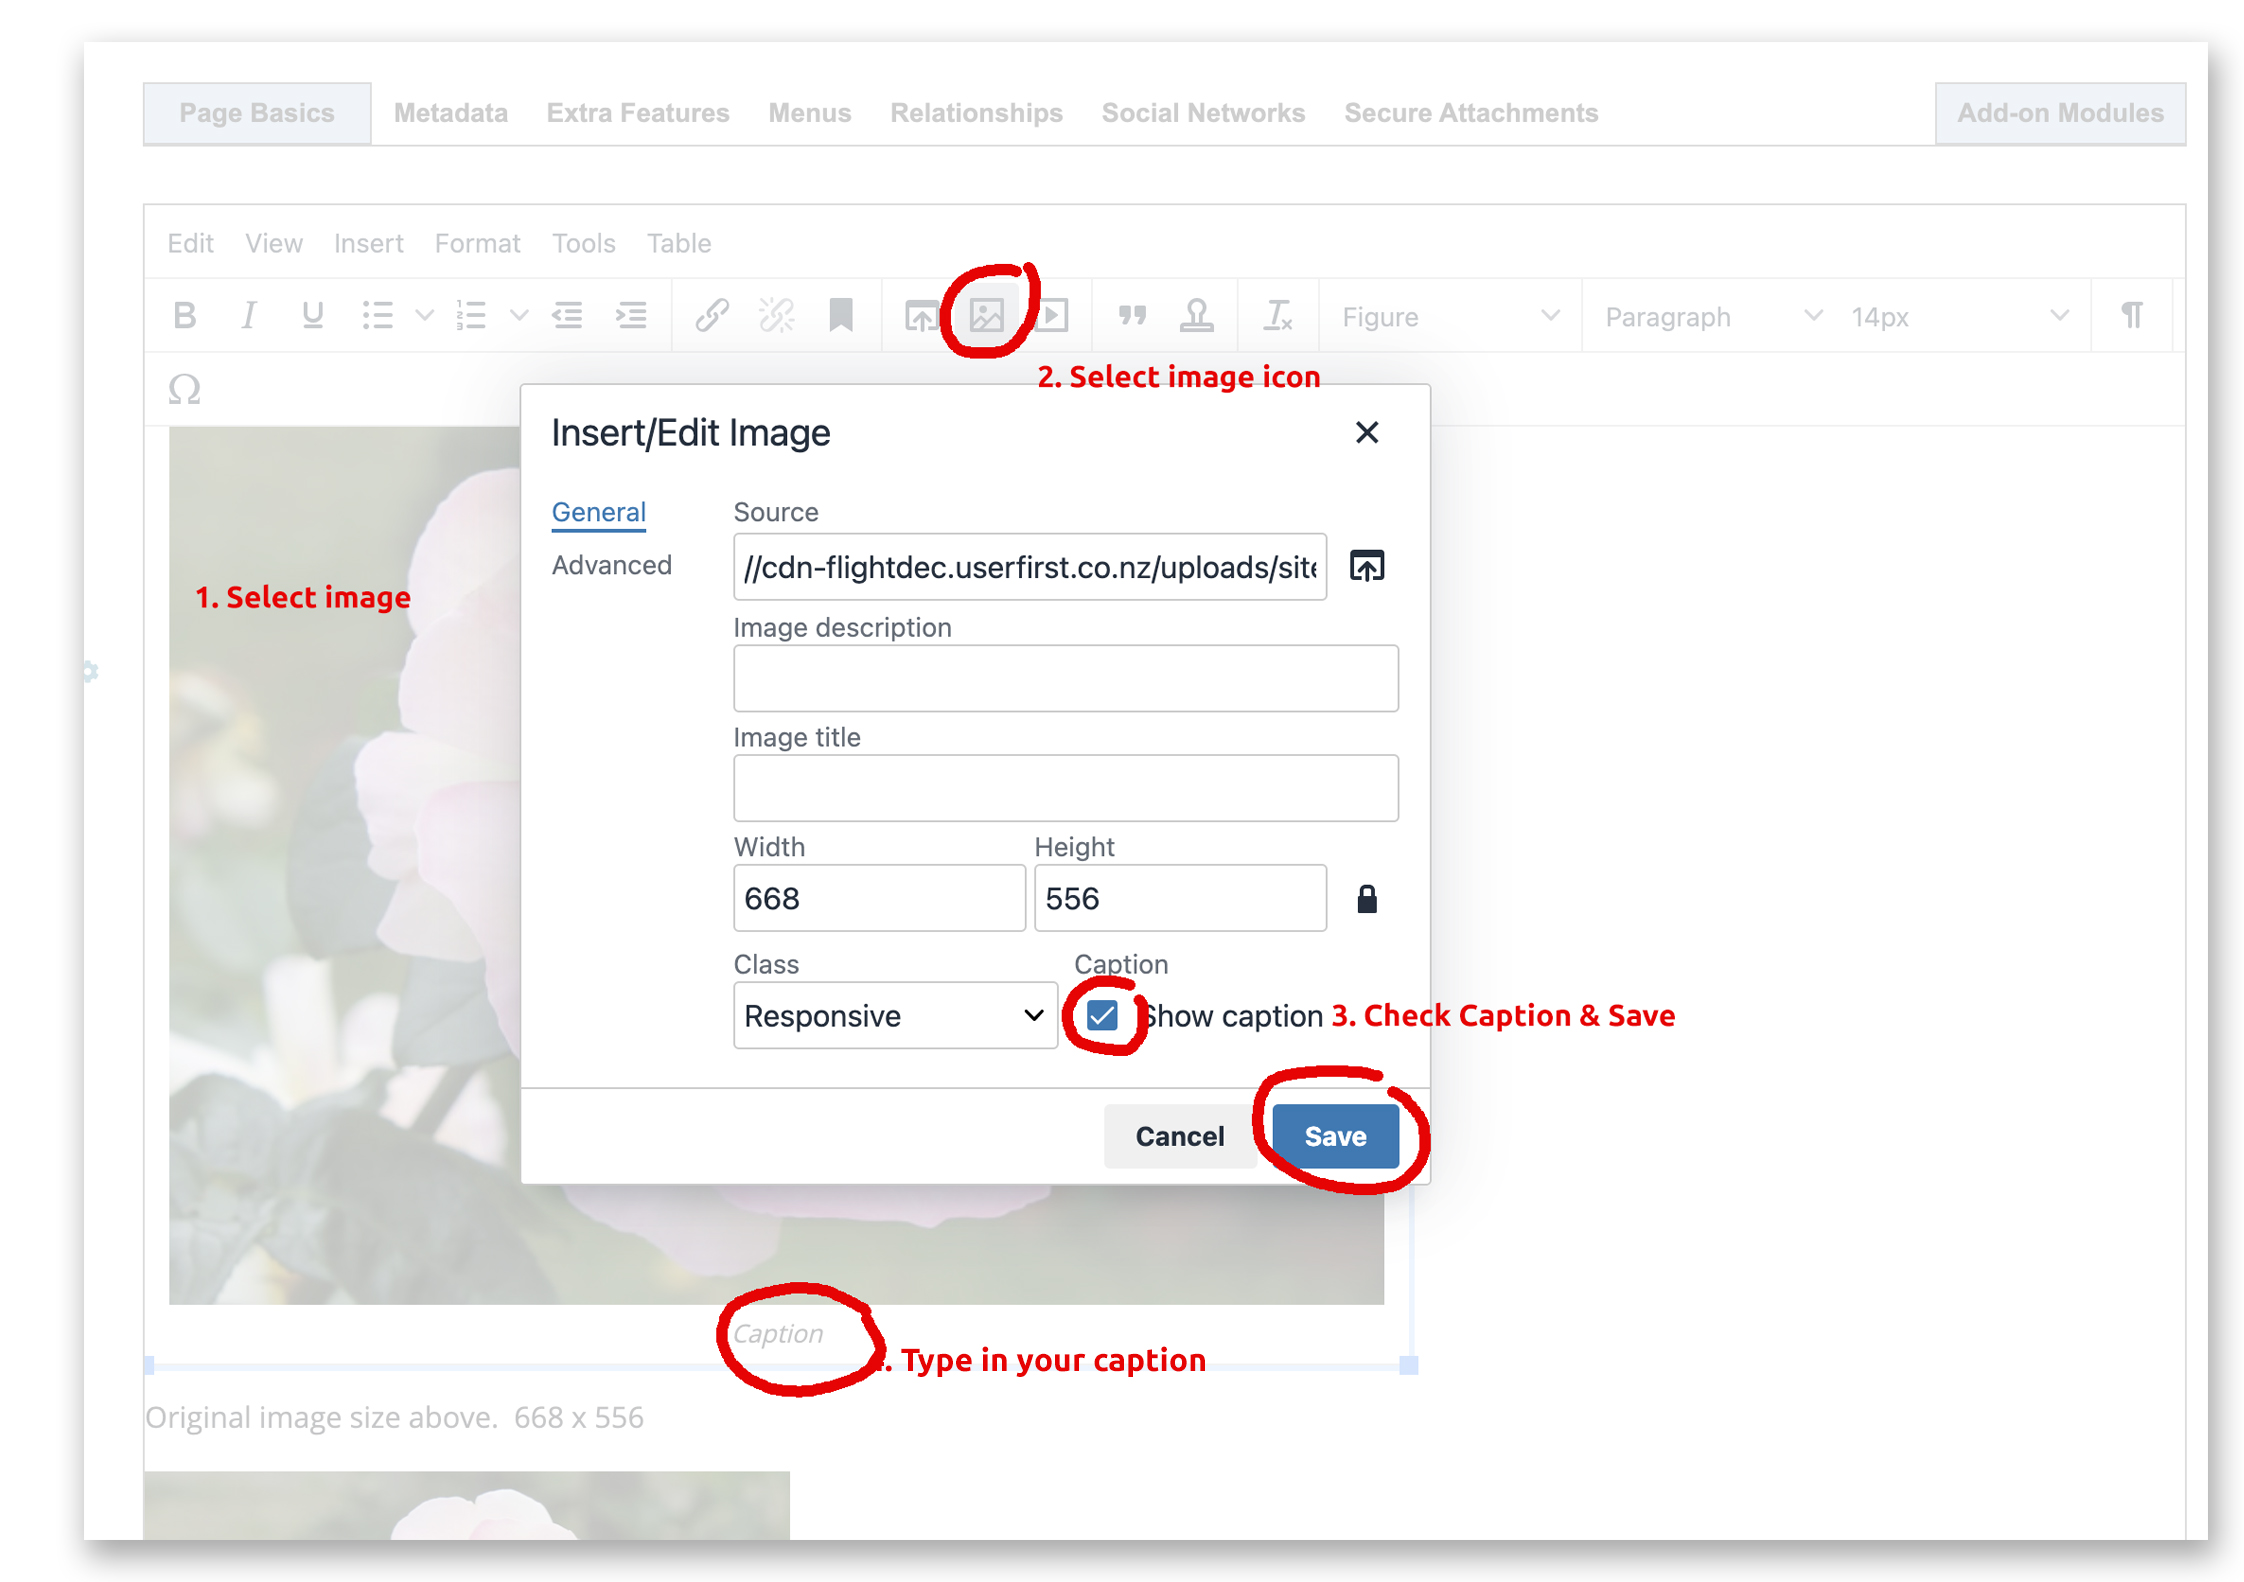
Captions under images
To get a caption aligned and flush underneath your image, it must be done in the order below.
Select the icon “Insert Details”, (looks like a photo of a mountain).
Tick the "Show caption" button. Click Save.
Highlight the word Caption and type in your caption text. Save Page.
If you wish the image to align left or right around body copy go to Paragraph/Alignment select left or right. (Not Block).
If it's not working, start afresh and reinsert your image.
A caption will look like this text here.
Note:Alternative description: a detailed explanation of an image that provides information to visually impaired users.
Image title: is the text which a user sees after hovering over the image.
Borders on images
To add a border to an image, (a thin black line)
Add your image to the page
Select your image
Select the ‘menu item' to the right of Clear formatting icon Tx)
In the dropdown > Special Styles >Img Border
SAVE PAGE
Link images, text and emails
Links to pages in your website - see below for links to external website pages
Start by harvesting the link - the URL extension of the landing page (page linking to). A URL extension is the bit from the forward slash on, e.g. website.com/page name - this is the bit you harvest /page name . It can be copied from the website URL panel or go the Pages List (left column) and click on a Copy Link and it will be saved for you.
Go to the page where the link will be displayed.
Click on the image or highlight the text that will receive the link.
Click on the Insert/edit link icon (looks like a chain) add in harvested link in the URL panel /page name
Open link in Current window.
Click Save > SAVE PAGE
Links to external website pages
Start by harvesting the full URL link from the external website page.
Go to your web page where the link will be displayed.
Select the image or text that will have the link on it.
Click on the Insert/edit link icon (looks like a chain) add in harvested link in the URL panel.
Open link in New window.
Click Save > SAVE PAGE
Link documents such as PDFs, Powerpoint Presentations and Word docs - see here
BACK TO MENU
IMAGE FIX
Image not showing on page
1. Check the File Type
Make sure your image is in one of the supported formats: JPG, PNG, or GIF.
2. Reformat and Re-upload
Go back to your original desktop image.
Reformat it (if needed).
Upload it again and insert it into the page.
3. Test on Another Page
Try inserting the image into a different page to check if the file itself works.
Reset missing images
Sometimes images disappear due to being moved or deleted in the File Manager.
Here's how to fix and missing image:
Go to the page where the image is missing.
Click on the blank image area or the broken image icon.
Click the “Image Details” icon (mountain photo).
In the Source field:
Note the file name and the folder path where the image should be located.
Click the "Browse Files" icon to the right of the Source field to open the File Manager.
Select the folder where the image should be.
If the image is already there: Insert your image by selecting it.
If the image is missing: Select ‘Drop files here or click to upload (top of File manger). Select your image from your computer and click Open.
Select your replacement image by clicking onto it.
Your image will appear on the page.
Save Page
Remove white space under an image
When image is placed on a page, it is automatically assigned the 'paragraph' style (normal text).
The paragraph style has a space of approximately 12px below, which is the white space you are seeing.
FIX:
Click on the image.
Select the middle 'Paragraph' dropdown in the editing tools and select 'Div element'. Make sure paragraph is not selected.
You DON'T have to be logged into your sites admin to do this.
Select the image and whist holding down on you mouse drag and drop the image to your desktop.
Index Images
Signature image, Thumbnail image, Preview Image, Feature Image, Featured Image, Cover Image, Listing Image, Post Preview, Highlight Image, Display Image
An index image is the main visual representation of a post. It typically appears as a thumbnail in news, events or posted content lists and may be displayed in different sizes and formats across websites and devices. A well-chosen index image helps capture attention, improves engagement, and provides context for the content.
Guidelines for Uploading Index Images:
Select the Right Image: Avoid using logos or text-heavy graphics. Choose visuals where important details aren’t located at the edges, as these may be cropped.
Fill the Frame: Ensure the image covers the entire space without leaving white or blank backgrounds.
Be Engaging: Use eye-catching, original images for each post rather than repeating the same image.
Size Requirement: The image should be at least 400 pixels on its shortest side to ensure clarity across devices.
Plan for Cropping: For portraits, choose a slightly landscape orientation and leave extra space above and below the subject’s face to prevent awkward cropping.
Capturing an Index Image, signature image Thumbnail image, Preview Image, Feature Image, Featured Image, Cover Image, Listing Image, Post Preview, Highlight Image, Display Image
Capturing an Index Image
When taking a screen capture for an index image, ensure the main content is centered, as it may be auto-cropped into a square or rectangle depending on display settings. Select a wide rectangular shape with a minimum of 400 pixels on the shortest side.
On Windows (PC):
Open the Snipping Tool by clicking the Start button or search icon and typing "Snipping Tool."
Select Mode (or the arrow next to New in earlier versions).
Choose Rectangular Snip, then select the desired area when the screen dims.
On macOS (Mac):
Press Shift + Command + 4.
Drag the crosshair to select the desired screen area.
Hold the Space bar to move the selection or press Esc to cancel.
How to create an Index or signature image.
Change an existing Signature / Index / Card or Page image
Find and edit the page you want to change the signature/index or page image on.
This is the actual page with full event or news details, not the index page with the list of item on it.